The Amplify UI FaceLivenessDetector is powered by Amazon Rekognition Face Liveness. The FaceLivenessDetector supports two types of verification challenges:
- The Face Movement and Light Challenge consists of a series of head movements and colored light tests.
- The Face Movement Challenge consists only of a series of head movements.
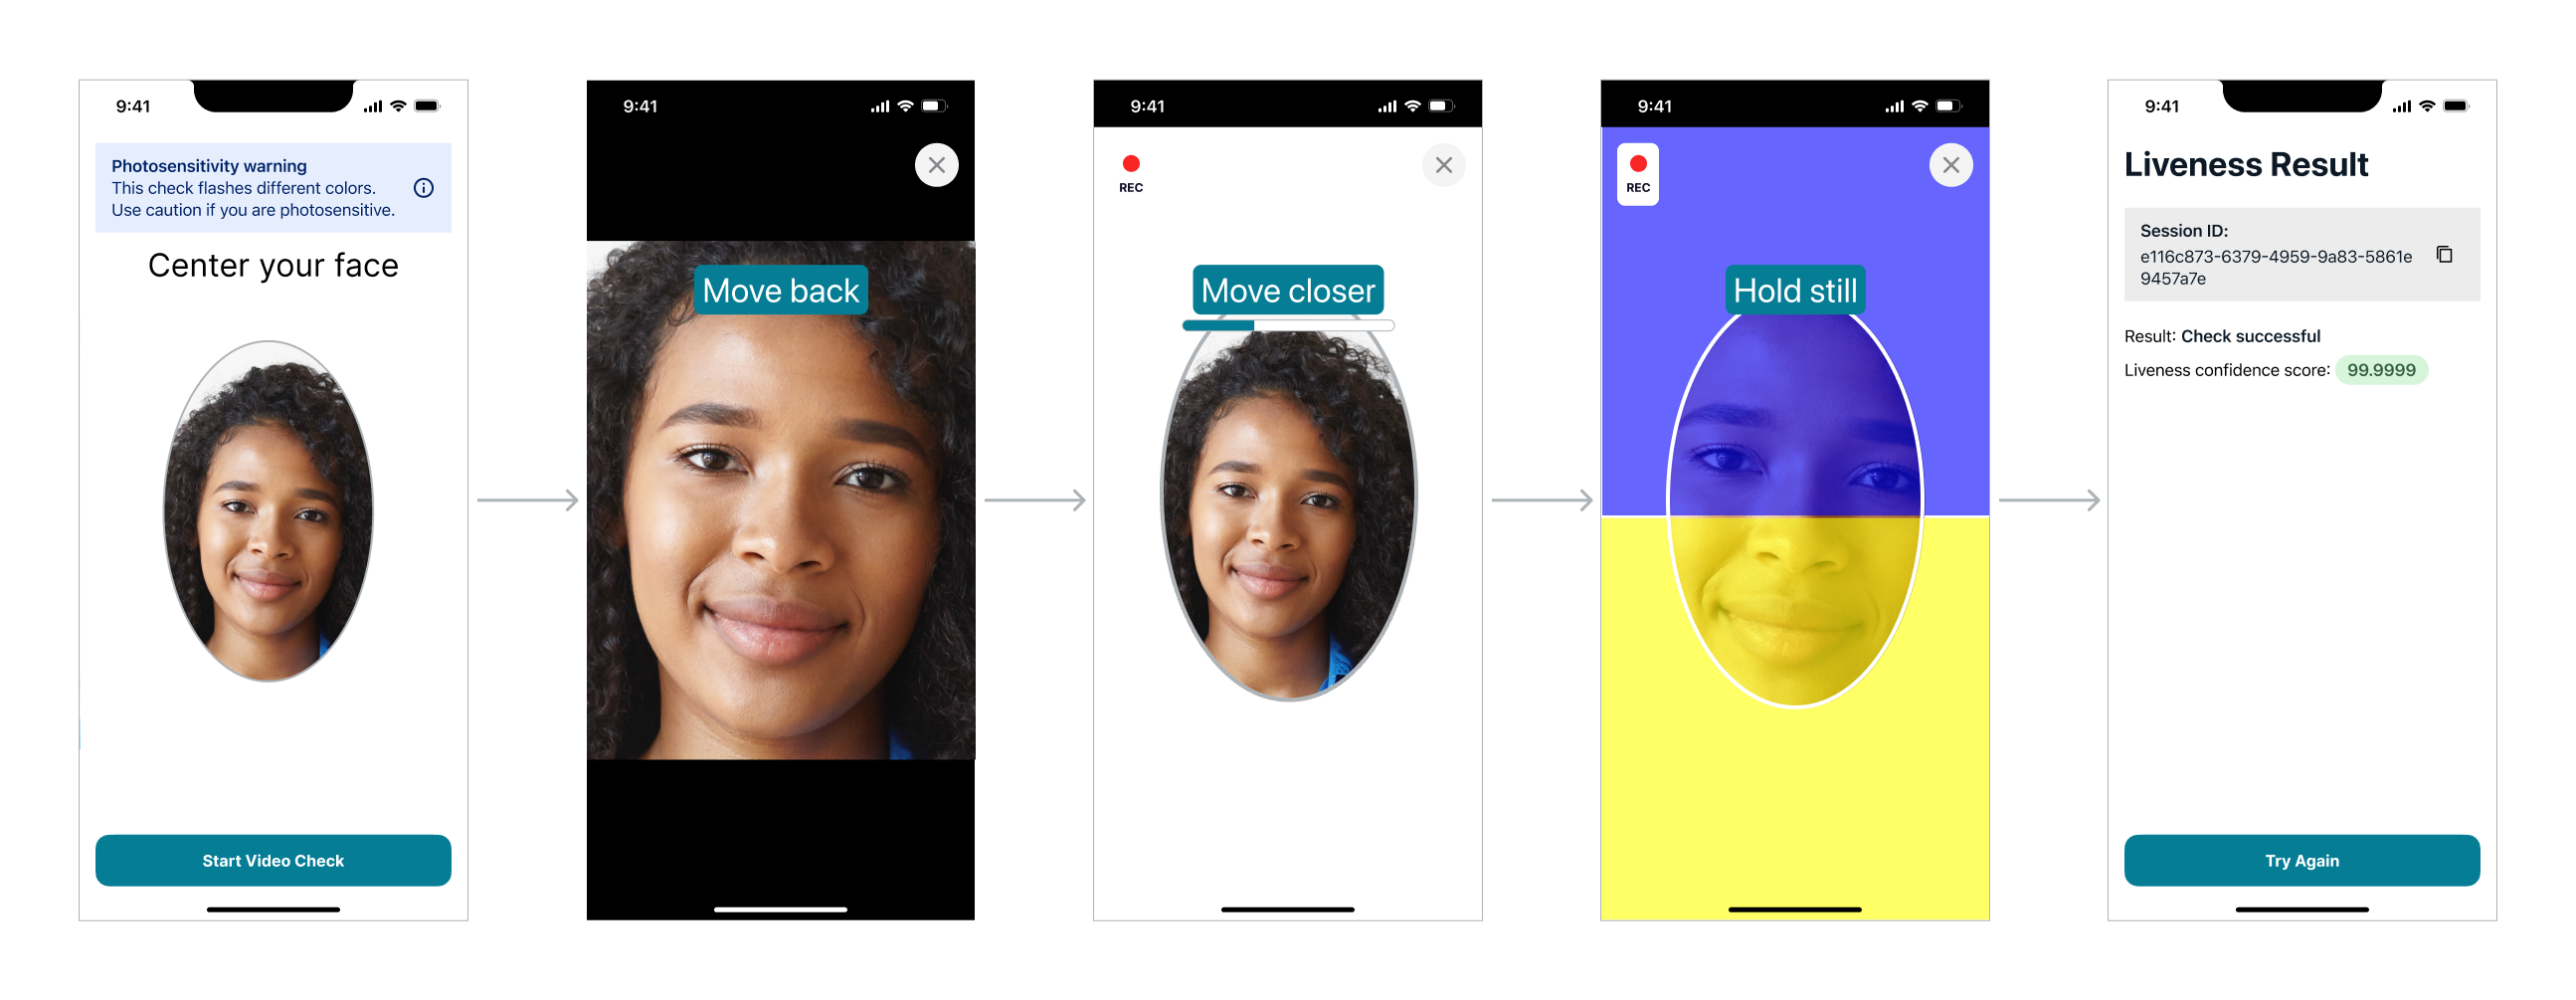
The following screenshots show an example of the Face Movement and Light Challenge in action.
To learn more about spoof attempts deterred by Face Liveness, please see this demonstration video on YouTube.
Quick start
Prerequisites:
- Install and configure the Amplify CLI by following this guide.
- An iOS application targeting at least iOS 14. For a full example of creating an iOS project, please follow the project setup walkthrough.
- A backend that is setup following the Amazon Rekognition Face Liveness developer guide.
Step 1. Configure Auth
There are four methods to setup the Amazon Cognito resources needed for Amplify Auth. The most common is the Amplify CLI create flow which asks a series of questions and will configure both a User Pool and Identity Pool automatically. The second option is the Amplify CLI import flow which adds an existing Cognito resource into Amplify. The third is to reuse or create a Cognito Identity Pool manually and to add it into your application. Finally the fourth is to pass a credentials provider which obtains the AWS credentials under your control.
Note: Using Cognito does not mean that you have to migrate your users. By default, FaceLivenessDetector uses a Cognito Identity Pool, for the sole purpose of signing requests to Rekognition.
Use the Amplify CLI to automatically configure and manage your Cognito Identity and User Pool for you.
FaceLivenessDetector uses Amplify Auth by default to authorize users to perform the Face Liveness check. If you are using Amplify for the first time, follow the instructions for installing the Amplify CLI.
Set up a new Amplify project
$ amplify init
? Enter a name for the project swiftliveness
? Initialize the project with the above configuration? No
? Enter a name for the environment dev
? Choose your default editor: Xcode (macOS only)
? Choose the type of app that you're building ios
Add the auth category
$ amplify add auth
 Do you want to use the default authentication and security configuration? Manual configuration

 Select the authentication/authorization services that you want to use: User Sign-Up, Sign-In, connected with AWS IAM controls (Enables per-user Storage features for images or other content, Analytics, and more)

 Provide a friendly name for your resource that will be used to label this category in the project: <default>

 Enter a name for your identity pool. <default>

 Allow unauthenticated logins? (Provides scoped down permissions that you can control via AWS IAM) Yes

 <Choose defaults for the rest of the questions>
Push to create the resources
$ amplify push
✔ Successfully pulled backend environment dev from the cloud.

Current Environment: dev

| Category | Resource name    | Operation | Provider plugin   |
| -------- | ---------------- | --------- | ----------------- |
| Auth     | swiftlive••••••• | Create    | awscloudformation |
If you have an existing backend, run amplify pull to sync your amplifyconfiguration.json with your cloud backend.
You should now have an amplifyconfiguration.json file in your app/src/main/res/raw directory with your latest backend configuration.
Update IAM Role Permissions
Now that you have Amplify Auth setup, follow the steps below to create an inline policy to enable authenticated app users to access Rekognition.
-
Go to AWS IAM console → Roles
-
Select the newly created
unauthRolefor your project (amplify-<project_name>-<env_name>-<id>-unauthRoleif using the Amplify CLI). Note thatunauthRoleshould be used if you are not logging in, but if you are using an authenticator with your application, you will need to useauthRole. -
Choose Add Permissions, then select Create Inline Policy, then choose JSON and paste the following:
{
    "Version": "2012-10-17",
    "Statement": [
        {
            "Effect": "Allow",
            "Action": "rekognition:StartFaceLivenessSession",
            "Resource": "*"
        }
    ]
}
-
Choose Review Policy
-
Name the policy
-
Choose Create Policy
To use Amplify UI FaceLivenessDetector, you must also set up a backend to create the Face Liveness session and retrieve the session results. Follow the Amazon Rekognition Face Liveness developer guide to set up your backend.
Step 2. Install dependencies
In Xcode, navigate to File > Add Packages...
Enter the Amplify UI Swift Liveness GitHub repo URL (https://github.com/aws-amplify/amplify-ui-swift-liveness) into the search bar and hit Enter. Wait for the result to load.
You'll see the Amplify UI Swift Liveness repository rules for which version of Liveness you want Swift Package Manager to install. Choose the dependency rule Up to Next Major Version, as it will use the latest compatible version of the dependency that can be detected in the repository. Then click Add Package.
Lastly, select the FaceLiveness product and click Add Package.
Step 3. Initialize Amplify Auth
FaceLivenessDetectorView is a SwiftUI component that uses Amplify Auth to handle authorizing requests. If you're not already using Amplify Auth in your application, follow the steps outlined here.
Step 4. Request camera permissions
FaceLivenessDetectorView requires access to the camera on the user's device in order to perform the Face Liveness check. Before displaying FaceLivenessDetectorView, prompt the user to grant camera permission. Please follow these guides for guidelines around requesting camera permission iOS Human Interface Guidelines | Accessing private data.
Step 5. Add FaceLivenessDetectorView
import SwiftUI
import FaceLiveness

struct MyView: View {
  @State private var isPresentingLiveness = true

  var body: some View {
    FaceLivenessDetectorView(
      sessionID: <session ID>,
      region: <region>,
      isPresented: $isPresentingLiveness,
      onCompletion: { result in
        switch result {
        case .success:
          // ...
        case .failure(let error):
          // ...
        default:
          // ...
        }
      }
    )
  }
}
If you previously had unmanaged resources that you want to manage with Amplify you can use the CLI to import your Cognito resources.
FaceLivenessDetector uses Amplify Auth by default to authorize users to perform the Face Liveness check. Follow the instructions for importing existing resources.
Update IAM Role Permissions
Now that you have Amplify Auth setup, follow the steps below to create an inline policy to enable authenticated app users to access Rekognition.
-
Go to AWS IAM console → Roles
-
Select the newly created
unauthRolefor your project (amplify-<project_name>-<env_name>-<id>-unauthRoleif using the Amplify CLI). Note thatunauthRoleshould be used if you are not logging in, but if you are using an authenticator with your application, you will need to useauthRole. -
Choose Add Permissions, then select Create Inline Policy, then choose JSON and paste the following:
{
    "Version": "2012-10-17",
    "Statement": [
        {
            "Effect": "Allow",
            "Action": "rekognition:StartFaceLivenessSession",
            "Resource": "*"
        }
    ]
}
-
Choose Review Policy
-
Name the policy
-
Choose Create Policy
To use Amplify UI FaceLivenessDetector, you must also set up a backend to create the Face Liveness session and retrieve the session results. Follow the Amazon Rekognition Face Liveness developer guide to set up your backend.
Step 2. Install dependencies
In Xcode, navigate to File > Add Packages...
Enter the Amplify UI Swift Liveness GitHub repo URL (https://github.com/aws-amplify/amplify-ui-swift-liveness) into the search bar and hit Enter. Wait for the result to load.
You'll see the Amplify UI Swift Liveness repository rules for which version of Liveness you want Swift Package Manager to install. Choose the dependency rule Up to Next Major Version, as it will use the latest compatible version of the dependency that can be detected in the repository. Then click Add Package.
Lastly, select the FaceLiveness product and click Add Package.
Step 3. Initialize Amplify Auth
FaceLivenessDetectorView is a SwiftUI component that uses Amplify Auth to handle authorizing requests. If you're not already using Amplify Auth in your application, follow the steps outlined here.
Step 4. Request camera permissions
FaceLivenessDetectorView requires access to the camera on the user's device in order to perform the Face Liveness check. Before displaying FaceLivenessDetectorView, prompt the user to grant camera permission. Please follow these guides for guidelines around requesting camera permission iOS Human Interface Guidelines | Accessing private data.
Step 5. Add FaceLivenessDetectorView
import SwiftUI
import FaceLiveness

struct MyView: View {
  @State private var isPresentingLiveness = true

  var body: some View {
    FaceLivenessDetectorView(
      sessionID: <session ID>,
      region: <region>,
      isPresented: $isPresentingLiveness,
      onCompletion: { result in
        switch result {
        case .success:
          // ...
        case .failure(let error):
          // ...
        default:
          // ...
        }
      }
    )
  }
}
Use this option if you already have a Cognito identity/user pools that you do not want to import to Amplify, or want to manage Cognito resources yourself or with a 3rd party resource management tool.
If you already have Cognito set up or do not want to use the Amplify CLI to generate Cognito resources, you can follow the documentation in the existing resources tab.
If you are manually setting up an identity pool in the Cognito console you can follow this guide. When setting up the identity pool ensure that access to unauthenticated identities is enabled.
When initially configuring Amplify (assuming you are using no pieces of Amplify other than the FaceLivenessDetector) you can manually create an amplifyconfiguration.json and add it your project’s main directory in this form:
{
  "auth": {
    "plugins": {
      "awsCognitoAuthPlugin": {
        "CredentialsProvider": {
          "CognitoIdentity": {
            "Default": {
              "PoolId": "us-east-1:-------------",
              "Region": "us-east-1"
            }
          }
        }
      }
    }
  }
}
Update IAM Role Permissions
Now that you have Amplify Auth setup, follow the steps below to create an inline policy to enable authenticated app users to access Rekognition.
-
Go to AWS IAM console → Roles
-
Select the newly created
unauthRolefor your project (amplify-<project_name>-<env_name>-<id>-unauthRoleif using the Amplify CLI). Note thatunauthRoleshould be used if you are not logging in, but if you are using an authenticator with your application, you will need to useauthRole. -
Choose Add Permissions, then select Create Inline Policy, then choose JSON and paste the following:
{
    "Version": "2012-10-17",
    "Statement": [
        {
            "Effect": "Allow",
            "Action": "rekognition:StartFaceLivenessSession",
            "Resource": "*"
        }
    ]
}
-
Choose Review Policy
-
Name the policy
-
Choose Create Policy
To use Amplify UI FaceLivenessDetector, you must also set up a backend to create the Face Liveness session and retrieve the session results. Follow the Amazon Rekognition Face Liveness developer guide to set up your backend.
Step 2. Install dependencies
In Xcode, navigate to File > Add Packages...
Enter the Amplify UI Swift Liveness GitHub repo URL (https://github.com/aws-amplify/amplify-ui-swift-liveness) into the search bar and hit Enter. Wait for the result to load.
You'll see the Amplify UI Swift Liveness repository rules for which version of Liveness you want Swift Package Manager to install. Choose the dependency rule Up to Next Major Version, as it will use the latest compatible version of the dependency that can be detected in the repository. Then click Add Package.
Lastly, select the FaceLiveness product and click Add Package.
Step 3. Initialize Amplify Auth
FaceLivenessDetectorView is a SwiftUI component that uses Amplify Auth to handle authorizing requests. If you're not already using Amplify Auth in your application, follow the steps outlined here.
Step 4. Request camera permissions
FaceLivenessDetectorView requires access to the camera on the user's device in order to perform the Face Liveness check. Before displaying FaceLivenessDetectorView, prompt the user to grant camera permission. Please follow these guides for guidelines around requesting camera permission iOS Human Interface Guidelines | Accessing private data.
Step 5. Add FaceLivenessDetectorView
import SwiftUI
import FaceLiveness

struct MyView: View {
  @State private var isPresentingLiveness = true

  var body: some View {
    FaceLivenessDetectorView(
      sessionID: <session ID>,
      region: <region>,
      isPresented: $isPresentingLiveness,
      onCompletion: { result in
        switch result {
        case .success:
          // ...
        case .failure(let error):
          // ...
        default:
          // ...
        }
      }
    )
  }
}
Use this option if you want more control over the process of obtaining AWS credentials.
By default, FaceLivenessDetector uses Amplify Auth to authorize users to perform the Face Liveness check. You can use your own credentials provider to retrieve credentials from Amazon Cognito or assume a role with Amazon STS, for example:
For long lived credentials, you may retrieve AWSCredentials by implementing your custom AWSCredentialsProvider.
/**
 Represents AWS credentials.

 Typically refers to long-term credentials that do not expire unless manually rotated or deactivated.
 These credentials are generally associated with an IAM (Identity and Access Management) user and are used to authenticate API requests to AWS services.

 - Properties:
 - accessKeyId: A unique identifier.
 - secretAccessKey: A secret key used to sign requests cryptographically.
 */

public protocol AWSCredentials {

    /// A unique identifier.
    var accessKeyId: String { get }

    /// A secret key used to sign requests cryptographically.
    var secretAccessKey: String { get }
}
import Amplify

struct MyCredentialsProvider: AWSCredentialsProvider {
    func fetchAWSCredentials() async throws -> AWSCredentials {
        // Return `AWSCredentials` object instance
    }
}
If you're providing temporary credentials, make sure that your AWSCredentials object conforms to AWSTemporaryCredentials, which must include sessionToken.
/**
 Represents temporary AWS credentials.

 Refers to short-term credentials generated by AWS STS (Security Token Service).
 These credentials are used for temporary access, often for applications, temporary roles, federated users, or scenarios requiring limited-time access.

 - Inherits: AWSCredentials

 - Properties:
 - sessionToken: A token that is required when using temporary security credentials to sign requests.
 - expiration: The expiration date and time of the temporary credentials.
 */
public protocol AWSTemporaryCredentials: AWSCredentials {

    /// A token that is required when using temporary security credentials to sign requests.
    var sessionToken: String { get }

    /// The expiration date and time of the temporary credentials.
    var expiration: Date { get }
}
import Amplify

struct MyCredentialsProvider: AWSCredentialsProvider {
    func fetchAWSCredentials() async throws -> AWSCredentials {
        // Return `AWSTemporaryCredentials` object instance
    }
}
import SwiftUI
import FaceLiveness

struct MyView: View {
  @State private var isPresentingLiveness = true

  var body: some View {
    FaceLivenessDetectorView(
      sessionID: <session ID>,
      region: <region>,
      credentialsProvider: MyCredentialsProvider(),
      isPresented: $isPresentingLiveness,
      onCompletion: { result in
        switch result {
        case .success:
          // ...
        case .failure(let error):
          // ...
        default:
          // ...
        }
      }
    )
  }
}
Note: The provided Credentials Provider's fetchAWSCredentials function is called once at the start of the liveness flow, with no token refresh.
Update IAM Role Permissions
Now that you have Amplify Auth setup, follow the steps below to create an inline policy to enable authenticated app users to access Rekognition.
-
Go to AWS IAM console → Roles
-
Select the newly created
unauthRolefor your project (amplify-<project_name>-<env_name>-<id>-unauthRoleif using the Amplify CLI). Note thatunauthRoleshould be used if you are not logging in, but if you are using an authenticator with your application, you will need to useauthRole. -
Choose Add Permissions, then select Create Inline Policy, then choose JSON and paste the following:
{
    "Version": "2012-10-17",
    "Statement": [
        {
            "Effect": "Allow",
            "Action": "rekognition:StartFaceLivenessSession",
            "Resource": "*"
        }
    ]
}
-
Choose Review Policy
-
Name the policy
-
Choose Create Policy
To use Amplify UI FaceLivenessDetector, you must also set up a backend to create the Face Liveness session and retrieve the session results. Follow the Amazon Rekognition Face Liveness developer guide to set up your backend.
Step 2. Install dependencies
In Xcode, navigate to File > Add Packages...
Enter the Amplify UI Swift Liveness GitHub repo URL (https://github.com/aws-amplify/amplify-ui-swift-liveness) into the search bar and hit Enter. Wait for the result to load.
You'll see the Amplify UI Swift Liveness repository rules for which version of Liveness you want Swift Package Manager to install. Choose the dependency rule Up to Next Major Version, as it will use the latest compatible version of the dependency that can be detected in the repository. Then click Add Package.
Lastly, select the FaceLiveness product and click Add Package.
Step 3. Request camera permissions
FaceLivenessDetectorView requires access to the camera on the user's device in order to perform the Face Liveness check. Before displaying FaceLivenessDetectorView, prompt the user to grant camera permission. Please follow these guides for guidelines around requesting camera permission iOS Human Interface Guidelines | Accessing private data.
Step 4. Add FaceLivenessDetectorView
import SwiftUI
import FaceLiveness

struct MyView: View {
  @State private var isPresentingLiveness = true

  var body: some View {
    FaceLivenessDetectorView(
      sessionID: <session ID>,
      region: <region>,
      isPresented: $isPresentingLiveness,
      onCompletion: { result in
        switch result {
        case .success:
          // ...
        case .failure(let error):
          // ...
        default:
          // ...
        }
      }
    )
  }
}
See Rekognition documentation for best practices when using
FaceLivenessDetector.
Full API Reference
FaceLivenessDetectorView Parameters
Below is the full list of parameters that can be used with the FaceLivenessDetectorView component. You can also reference the source code here.
| Name | Description | Type |
|---|---|---|
| sessionID | The sessionID as returned by CreateFaceLivenessSession API. | |
| credentialsProvider | An optional parameter that provides AWS Credentials | |
| region | The AWS region to stream the video to, this should match the region you called the CreateFaceLivenessSession API in. | |
| disableStartView | Optional parameter for the disabling the intial view with instructions, default: false. | |
| challengeOptions | Optional parameter that allows you to configure options for a given liveness challenge. | |
| isPresented | A Binding parameter for whether the LivenessDetectorView is presented. | |
| onCompletion | Callback that signals when the liveness session has completed and if a error occurred. | |
Error States
Below is the full list of error states that can be returned from the onCompletion handler of FaceLivenessDetectorView. You can also reference the source code here.
| Name | Description | Type |
|---|---|---|
| .unknown | An unknown error occurred. | |
| .sessionNotFound | Session not found. | |
| .sessionTimedOut | The session timed out and did not receive response from server within the time limit. | |
| .faceInOvalMatchExceededTimeLimitError | The face did not match within oval in the required time limit. | |
| .accessDenied | Not authorized to perform a face liveness check. | |
| .cameraPermissionDenied | The camera permission has not been granted. | |
| .cameraNotAvailable | The camera is not available due to a hardware issue. | |
| .userCancelled | The user cancelled the face liveness check. | |
| .socketClosed | The web socket connection unexpectedly closed. | |
| .invalidRegion | The region provided is invalid. | |
| .validation | The input fails to satisfy the constraints specified by the service. | |
| .internalServer | An Unexpected error during processing of the request by the service. | |
| .throttling | A request was denied due to request throttling by the service. | |
| .serviceQuotaExceeded | This error cccurs when a request would cause a service quota to be exceeded. | |
| .serviceUnavailable | Service-wide throttling to recover from an operational event or service is not able to scale. | |
| .invalidSignature | The signature on the request is invalid. | |