The Amplify UI FaceLivenessDetector is powered by Amazon Rekognition Face Liveness. The FaceLivenessDetector supports two types of verification challenges:
- The Face Movement and Light Challenge consists of a series of head movements and colored light tests.
- The Face Movement Challenge consists only of a series of head movements.
The following screenshots show an example of the Face Movement and Light Challenge in action.
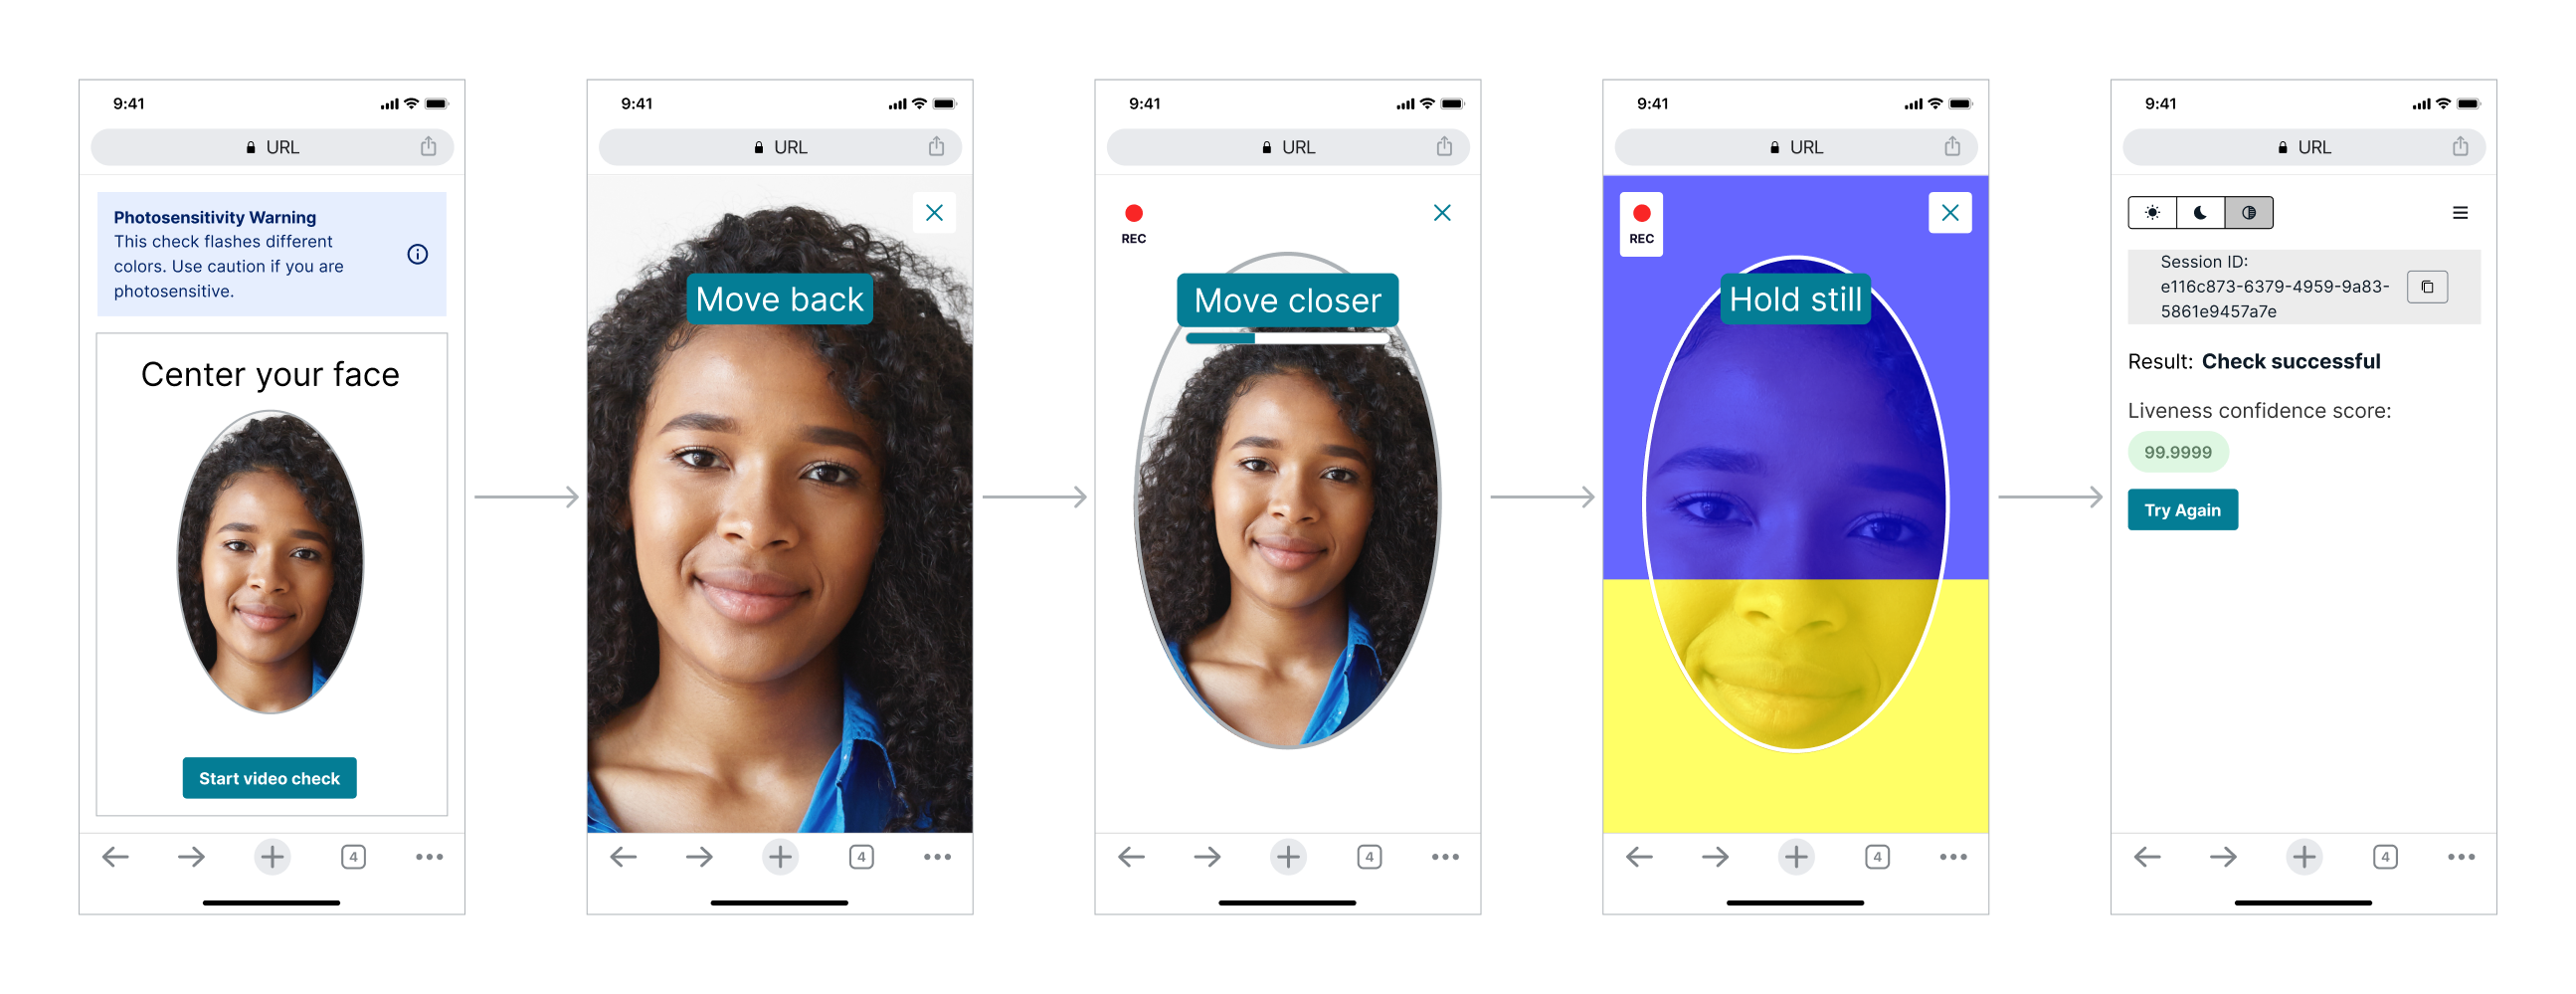
To learn more about spoof attempts deterred by Face Liveness, please see this demonstration video on YouTube.
Quick start
Prerequisites:
- Install and configure the Amplify CLI by following this guide.
- A backend that is setup following the Amazon Rekognition Face Liveness developer guide.
Step 1. Configure Auth
There are multiple methods to setup the Amazon Cognito resources needed for Amplify Auth. The recommended option is using Amplify Gen 2 to generate an Auth backend.
Note: Using Cognito does not mean that you have to migrate your users. By default, FaceLivenessDetector uses a Cognito Identity Pool, for the sole purpose of signing requests to Rekognition.
Use Amplify Gen 2 to setup and manage your Cognito Identity and User Pool in code
FaceLivenessDetector uses Amplify Auth by default to authorize users to perform the Face Liveness check. If you are using Amplify for the first time, follow the instructions for installing Amplify Gen 2.
npm add --save-dev @aws-amplify/backend@latest @aws-amplify/backend-cli@latestyarn add @aws-amplify/backend@latest @aws-amplify/backend-cli@latest --devThen follow the instructions for setting up a default Amplify Auth resource.
Now that you have Amplify Auth setup, add the following code to your backend.ts file to create an inline policy to enable authenticated app users to access Rekognition.
const livenessStack = backend.createStack("liveness-stack");

const livenessPolicy = new Policy(livenessStack, "LivenessPolicy", {
  statements: [
    new PolicyStatement({
      actions: ["rekognition:StartFaceLivenessSession"],
      resources: ["*"],
    }),
  ],
});
backend.auth.resources.unauthenticatedUserIamRole.attachInlinePolicy(livenessPolicy); // allows guest user access
backend.auth.resources.authenticatedUserIamRole.attachInlinePolicy(livenessPolicy); // allows logged in user access
Use the Amplify Gen 1 CLI to automatically configure and manage your Cognito Identity and User Pool for you.
FaceLivenessDetector uses Amplify Auth by default to authorize users to perform the Face Liveness check. If you are using Amplify for the first time, follow the instructions for installing the Amplify CLI.
Set up a new Amplify project
$ amplify init
? Enter a name for the project reactliveness
? Enter a name for the environment dev
? Choose your default editor: Visual Studio Code
? Choose the type of app that you're building javascript
Please tell us about your project
? What javascript framework are you using react
? Source Directory Path:  src
? Distribution Directory Path: build
? Build Command:  npm run-script build
? Start Command: npm run-script start
Add the auth category
$ amplify add auth
 Do you want to use the default authentication and security configuration? Manual configuration

 Select the authentication/authorization services that you want to use: User Sign-Up, Sign-In, connected with AWS IAM controls (Enables per-user Storage features for images or other content, Analytics, and more)

 Provide a friendly name for your resource that will be used to label this category in the project: <default>

 Enter a name for your identity pool. <default>

 Allow unauthenticated logins? (Provides scoped down permissions that you can control via AWS IAM) Yes

 <Choose defaults for the rest of the questions>
Push to create the resources
$ amplify push
✔ Successfully pulled backend environment dev from the cloud.

Current Environment: dev

| Category | Resource name    | Operation | Provider plugin   |
| -------- | ---------------- | --------- | ----------------- |
| Auth     | reactlive••••••• | Create    | awscloudformation |
If you have an existing Amplify backend, run amplify pull to sync your aws-exports.js with your cloud backend.
Once complete you should now have an aws-exports.js file in your src directory with your latest Amplify backend configuration.
Update IAM Role Permissions
Now that you have Amplify Auth setup, follow the steps below to create an inline policy to enable authenticated app users to access Rekognition.
-
Go to AWS IAM console → Roles
-
Select the newly created
unauthRolefor your project (amplify-<project_name>-<env_name>-<id>-unauthRoleif using the Amplify CLI). Note thatunauthRoleshould be used if you are not logging in, but if you are using an authenticator with your application, you will need to useauthRole. -
Choose Add Permissions, then select Create Inline Policy, then choose JSON and paste the following:
{
    "Version": "2012-10-17",
    "Statement": [
        {
            "Effect": "Allow",
            "Action": "rekognition:StartFaceLivenessSession",
            "Resource": "*"
        }
    ]
}
-
Choose Review Policy
-
Name the policy
-
Choose Create Policy
To use Amplify UI FaceLivenessDetector, you must also set up a backend to create the Face Liveness session and retrieve the session results. Follow the Amazon Rekognition Face Liveness developer guide to set up your backend.
If you previously had unmanaged resources that you want to manage with Amplify Gen 1 you can use the CLI to import your Cognito resources.
FaceLivenessDetector uses Amplify Auth by default to authorize users to perform the Face Liveness check. Follow the instructions for Amplify CLI (Import) to manage your Cognito resources with Amplify.
Once complete you should now have an aws-exports.js file in your src directory with your latest Amplify backend configuration.
Update IAM Role Permissions
Now that you have Amplify Auth setup, follow the steps below to create an inline policy to enable authenticated app users to access Rekognition.
-
Go to AWS IAM console → Roles
-
Select the newly created
unauthRolefor your project (amplify-<project_name>-<env_name>-<id>-unauthRoleif using the Amplify CLI). Note thatunauthRoleshould be used if you are not logging in, but if you are using an authenticator with your application, you will need to useauthRole. -
Choose Add Permissions, then select Create Inline Policy, then choose JSON and paste the following:
{
    "Version": "2012-10-17",
    "Statement": [
        {
            "Effect": "Allow",
            "Action": "rekognition:StartFaceLivenessSession",
            "Resource": "*"
        }
    ]
}
-
Choose Review Policy
-
Name the policy
-
Choose Create Policy
To use Amplify UI FaceLivenessDetector, you must also set up a backend to create the Face Liveness session and retrieve the session results. Follow the Amazon Rekognition Face Liveness developer guide to set up your backend.
Use this option if you already have a Cognito identity/user pools that you do not want to import to Amplify, or want to manage Cognito resources yourself or with a 3rd party resource management tool.
If you already have Cognito set up or do not want to use the Amplify Gen 1 CLI to generate Cognito resources, you can follow the documentation in the existing resources tab or check out the code snippet below.
If you are manually setting up an identity pool in the Cognito console you can follow this guide. When setting up the identity pool ensure that access to unauthenticated identities is enabled.
When initially configuring Amplify you can pass in the cognito region and an identity pool instead of using the Amplify generated aws-exports file.
import React from 'react';
import { ThemeProvider } from '@aws-amplify/ui-react';
import { Amplify } from 'aws-amplify';
import '@aws-amplify/ui-react/styles.css';
import awsexports from './aws-exports';

Amplify.configure({
   ...awsexports,
  "aws_cognito_region": "us-east-2", // (required) - Region where Amazon Cognito project was created
  "aws_cognito_identity_pool_id": "us-east-2:xxx-xxx-xxx-xxx-xxx", // (required) - the pool region should match the cognito region
});

export default function App() {
  return (
    <ThemeProvider>
    </ThemeProvider>
  );
}
Update IAM Role Permissions
Now that you have Amplify Auth setup, follow the steps below to create an inline policy to enable authenticated app users to access Rekognition.
-
Go to AWS IAM console → Roles
-
Select the newly created
unauthRolefor your project (amplify-<project_name>-<env_name>-<id>-unauthRoleif using the Amplify CLI). Note thatunauthRoleshould be used if you are not logging in, but if you are using an authenticator with your application, you will need to useauthRole. -
Choose Add Permissions, then select Create Inline Policy, then choose JSON and paste the following:
{
    "Version": "2012-10-17",
    "Statement": [
        {
            "Effect": "Allow",
            "Action": "rekognition:StartFaceLivenessSession",
            "Resource": "*"
        }
    ]
}
-
Choose Review Policy
-
Name the policy
-
Choose Create Policy
To use Amplify UI FaceLivenessDetector, you must also set up a backend to create the Face Liveness session and retrieve the session results. Follow the Amazon Rekognition Face Liveness developer guide to set up your backend.
Use this option if you want more control over the process of obtaining AWS credentials.
By default, FaceLivenessDetector uses Amplify Auth to authorize users to perform the Face Liveness check. You can use your own credentials provider to retrieve credentials from Amazon Cognito or assume a role with Amazon STS, for example:
import { FaceLivenessDetectorCore, AwsCredentialProvider } from '@aws-amplify/ui-react-liveness';

const credentialProvider: AwsCredentialProvider = async () => {
  // Fetch the credentials
}

return (
  <FaceLivenessDetectorCore
    sessionId={'<sessionId>'}
    region={'<region>'}
    onAnalysisComplete={() => {}}
    onError={onError}
    config={{ credentialProvider }}
  />
);
Note: The provided Credentials Provider's fetchAWSCredentials function is called once at the start of the liveness flow, with no token refresh.
Update IAM Role Permissions
Now that you have Amplify Auth setup, follow the steps below to create an inline policy to enable authenticated app users to access Rekognition.
-
Go to AWS IAM console → Roles
-
Select the newly created
unauthRolefor your project (amplify-<project_name>-<env_name>-<id>-unauthRoleif using the Amplify CLI). Note thatunauthRoleshould be used if you are not logging in, but if you are using an authenticator with your application, you will need to useauthRole. -
Choose Add Permissions, then select Create Inline Policy, then choose JSON and paste the following:
{
    "Version": "2012-10-17",
    "Statement": [
        {
            "Effect": "Allow",
            "Action": "rekognition:StartFaceLivenessSession",
            "Resource": "*"
        }
    ]
}
-
Choose Review Policy
-
Name the policy
-
Choose Create Policy
To use Amplify UI FaceLivenessDetector, you must also set up a backend to create the Face Liveness session and retrieve the session results. Follow the Amazon Rekognition Face Liveness developer guide to set up your backend.
Step 2. Install dependencies
npm install @aws-amplify/ui-react-liveness aws-amplifyyarn add @aws-amplify/ui-react-liveness aws-amplifyStep 3. Initialize Amplify
Next.js 13.4+ introduces App Router with the usage of Server Components. Amplify UI components are interactive and designed to work on the client side. To use them inside of Server Components you must wrap them in a Client Component with "use client". For more info, visit Next.js third party package documentation.
If you are using Next.js Pages Router, no changes are required to use Amplify UI components.
import React from 'react';
import { ThemeProvider } from '@aws-amplify/ui-react';
import { Amplify } from 'aws-amplify';
import '@aws-amplify/ui-react/styles.css';
import awsexports from './aws-exports';

Amplify.configure(awsexports);

export default function App() {
  return (
    <ThemeProvider>
    </ThemeProvider>
  );
}
Step 4. Add FaceLivenessDetector
To get started you will need to make a request to your backend to receive a sessionId and pass that to the FaceLivenessDetector component.
Once a valid sessionId, region, and callback has been passed, FaceLivenessDetector will take care of streaming video and presenting Face Liveness challenges.
import React from 'react';
import { FaceLivenessDetector } from '@aws-amplify/ui-react-liveness';
import { Loader, ThemeProvider } from '@aws-amplify/ui-react';

export function LivenessQuickStartReact() {
  const [loading, setLoading] = React.useState<boolean>(true);
  const [createLivenessApiData, setCreateLivenessApiData] = React.useState<{
    sessionId: string;
  } | null>(null);

  const fetchCreateLiveness = async () => {
    /*
     * This should be replaced with a real call to your own backend API
     */
    await new Promise((r) => setTimeout(r, 2000));
    const mockResponse = { sessionId: 'mockSessionId' };
    const data = mockResponse;
    setCreateLivenessApiData(data);
    setLoading(false);
  };

  React.useEffect(() => {
    fetchCreateLiveness();
  }, []);

  const handleAnalysisComplete: () => Promise<void> = async () => {
    /*
     * This should be replaced with a real call to your own backend API
     */
    const response = await fetch(
      `/api/get?sessionId=${createLivenessApiData.sessionId}`
    );
    const data = await response.json();

    /*
     * Note: The isLive flag is not returned from the GetFaceLivenessSession API
     * This should be returned from your backend based on the score that you
     * get in response. Based on the return value of your API you can determine what to render next.
     * Any next steps from an authorization perspective should happen in your backend and you should not rely
     * on this value for any auth related decisions.
     */
    if (data.isLive) {
      console.log('User is live');
    } else {
      console.log('User is not live');
    }
  };

  // Use a ref to track if we're currently handling an error
  const isHandlingError = React.useRef(false);

  const handleError = async (error) => {
    console.error('Liveness error:', error);

    // Simple infinite loop prevention
    if (isHandlingError.current) return;
    isHandlingError.current = true;
    setLoading(true);

    // Create a new session for retry - sessions are single-use
    await fetchCreateLiveness();

    // Reset error handling flag
    isHandlingError.current = false;
  };

  return (
    <ThemeProvider>
      {loading ? (
        <Loader />
      ) : (
        <FaceLivenessDetector
          sessionId={createLivenessApiData.sessionId}
          region="us-east-1"
          onAnalysisComplete={handleAnalysisComplete}
          onError={handleError}
        />
      )}
    </ThemeProvider>
  );
}
import React from 'react';
import { FaceLivenessDetector } from '@aws-amplify/ui-react-liveness';
import { Loader, ThemeProvider } from '@aws-amplify/ui-react';

export function LivenessQuickStartReact() {
  const [loading, setLoading] = React.useState(true);
  const [createLivenessApiData, setCreateLivenessApiData] =
    React.useState(null);
  const fetchCreateLiveness = async () => {
      /*
       * This should be replaced with a real call to your own backend API
       */
      await new Promise((r) => setTimeout(r, 2000));
      const mockResponse = { sessionId: 'mockSessionId' };
      const data = mockResponse;

      setCreateLivenessApiData(data);
      setLoading(false);
  };

  React.useEffect(() => {
    fetchCreateLiveness();
  }, []);

  const handleAnalysisComplete = async () => {
    /*
     * This should be replaced with a real call to your own backend API
     */
    const response = await fetch(
      `/api/get?sessionId=${createLivenessApiData.sessionId}`
    );
    const data = await response.json();

    /*
     * Note: The isLive flag is not returned from the GetFaceLivenessSession API
     * This should be returned from your backend based on the score that you
     * get in response. Based on the return value of your API you can determine what to render next.
     * Any next steps from an authorization perspective should happen in your backend and you should not rely
     * on this value for any auth related decisions.
     */
    if (data.isLive) {
      console.log('User is live');
    } else {
      console.log('User is not live');
    }
  };

  // Use a ref to track if we're currently handling an error
  const isHandlingError = React.useRef(false);

  const handleError = async (error) => {
      console.error('Liveness error:', error);

      // Simple infinite loop prevention
      if (isHandlingError.current) return;
      isHandlingError.current = true;
      setLoading(true);

      // Create a new session for retry - sessions are single-use
      await fetchCreateLiveness();

      // Reset error handling flag
      isHandlingError.current = false;
  };

  return (
    <ThemeProvider>
      {loading ? (
        <Loader />
      ) : (
        <FaceLivenessDetector
          sessionId={createLivenessApiData.sessionId}
          region="us-east-1"
          onAnalysisComplete={handleAnalysisComplete}
          onError={handleError}
        />
      )}
    </ThemeProvider>
  );
}
Error handling
When errors occur during liveness detection, It is required to create a new session before allowing users to retry. Session IDs are single-use and cannot be reused after an error.
See Rekognition documentation for best practices when using
FaceLivenessDetector.
Full API Reference
FaceLivenessDetectorProps
Below is the full list of props that can be used with the FaceLivenessDetector component.
| Name | Description | Type |
|---|---|---|
| sessionId | The sessionId as returned by CreateFaceLivenessSession API. | |
| onAnalysisComplete | Callback that signals when the liveness session has completed analysis. At this point a request can be made to GetFaceLivenessSessionResults. | |
| region | The AWS region to stream the video to, this should match the region you called the CreateFaceLivenessSession API in. | |
| onUserCancel? | Callback called when the user cancels the flow. This callback is also called when users click the "Try Again" button in the default error modal. | |
| onError? | Callback called when there is error occured on any step. | |
| disableStartScreen? | Optional parameter for the disabling the start screen, default: false. | |
| components? | Optional object for overriding some UI components. | |
| displayText? | Optional object for internationalizing strings. | |
| config? | Optional parameter for advanced options for the component. | |
FaceLivenessDetectorComponents
Below is the full list of props that can be used with the FaceLivenessDetectorComponents. You can also reference the example here.
| Name | Description | Type |
|---|---|---|
| PhotosensitiveWarning? | Applies only to Face Movement and Light Challenge; PhotosensitiveWarning will not render with the Face Movement Challenge. Overrides the rendered component for the photosensitivity warning. | |
| ErrorView? | Overrides the rendered component for error view. | |
FaceLivenessDetectorConfig
Below is the full list of props that can be used with the FaceLivenessDetectorConfig. For instructions on using your own CDN check here.
| Name | Description | Type |
|---|---|---|
| binaryPath? | Overrides the WASM binary path, the default is https://cdn.liveness.rekognition.amazonaws.com/face-detection/tensorflow/tfjs-backend-wasm/3.11.0/. When overriding this path ensure that the wasm version matches the version of @tensorflow/tfjs-backend-wasm installed by npm. | |
| faceModelUrl? | Overrides the Blazeface model and weights bin CDN URL. Default value is https://cdn.liveness.rekognition.amazonaws.com/face-detection/tensorflow-models/blazeface/0.0.7/model/model.json | |
FaceLivenessDetectorCoreConfig
Below is the full list of props that can be used with the FaceLivenessDetectorCoreConfig. This config can only be used with the <FaceLivenessDetectorCore /> component.
| Name | Description | Type |
|---|---|---|
| binaryPath? | Overrides the WASM binary path, the default is https://cdn.liveness.rekognition.amazonaws.com/face-detection/tensorflow/tfjs-backend-wasm/4.11.0/. When overriding this path ensure that the wasm version matches the version of @tensorflow/tfjs-backend-wasm installed by npm. | |
| faceModelUrl? | Overrides the Blazeface model and weights bin CDN URL. Default value is https://cdn.liveness.rekognition.amazonaws.com/face-detection/tensorflow-models/blazeface/1.0.2/model/model.json | |
| credentialProvider? | An optional callback that provides AWS Credentials. | |
| systemClockOffset? | An optional parameter for overriding the systemClockOffset for the rekognition streaming client. Represents the difference between system clock and AWS server clock in milliseconds. See https://docs.aws.amazon.com/AWSJavaScriptSDK/v3/latest/Package/-aws-sdk-middleware-signing/Interface/AwsAuthInputConfig/ | |
LivenessError
Below is the LivenessError type used in the onError function that should give you more granularity into the types of errors happening in the component.
| Name | Description | Type |
|---|---|---|
| state | The LivenessErrorState value which indicates the general error type as seen from the component. | |
| error | The error object containing the more specific error name and stack trace. | |
LivenessErrorState
Below is the full list of error states that can be returned from the onError prop.
| Name | Description | Type |
|---|---|---|
| RUNTIME_ERROR | Indicates an error that occurs in the component runtime. | |
| SERVER_ERROR | Indicates an error occurred from the Rekognition streaming API or in the onAnalysisComplete callback. | |
| CONNECTION_TIMEOUT | Indicates a timeout occurred during the initial websocket connection. | |
| TIMEOUT | Indicates a timeout occurred when user attempted a liveness check. | |
| FACE_DISTANCE_ERROR | Indicates that the user moved their face too close to the camera before the check started. | |
| CAMERA_ACCESS_ERROR | Indicates that an error occurred when attempting to access the user's camera, this could be because they did not allow camera permissions in the browser. | |
| CAMERA_FRAMERATE_ERROR | Indicates that the provided camera does not meet the minimum framerate requirements for a liveness check. | |
| FRESHNESS_TIMEOUT | Indicates that the component timed out when attempting to determine freshness of the video via colors flashing on the screen. | |
| MOBILE_LANDSCAPE_ERROR | Indicates that the user attempted to switch to using landscape mode which is not supported. | |
| MULTIPLE_FACES_ERROR | Indicates that multiple faces have been detected within the frame. | |
LivenessDisplayText
The text in FaceLivenessDetector is defined as string resources in the component's displayText.ts file.